
Learning the friendly way
Dive into our resources, guides, and articles for all things money-related. Grow your financial confidence with our experts curated tips and articles for both experienced and new investors.
LATEST ARTICLEs

Picture this: You're scrolling through DeFi platforms, and suddenly you see two different projects. One screams "12% APR!" while another boasts "12% APY!" Your brain probably thinks, "Same, right?"
Wrong. Very wrong.
When it comes to comparing interest rates, APR and APY might look like twins… but they’re not. Far from it. The difference between them can determine whether you grow your savings or overpay on a loan. In this guide, we’ll break down what APR and APY really mean, how they work in banking, lending, and crypto, and how understanding them can help you make smarter financial decisions.
Key Takeaways
- APR (Annual Percentage Rate) shows the yearly cost of borrowing, including interest and certain fees.
- APY (Annual Percentage Yield) reflects your total yearly return, factoring in compounding.
- For borrowers, lower APR = lower total cost. For savers, higher APY = higher returns.
- In crypto and DeFi, compounding frequency can turn modest APRs into much higher APYs.
APY vs APR: The Essential Difference
At a glance, APR tells you how much interest you’ll pay (or earn) over a year, without compounding. APY, on the other hand, includes compounding, the process where interest earns more interest over time.
When comparing financial products, whether a credit card, savings account, or staking pool, this distinction matters. For borrowers, APR reveals the true cost of debt, while for investors, APY highlights the power of compound growth.
TL;DR. APR is about cost, APY is about growth. Knowing which one applies helps you choose between competing offers with confidence.
What Is APR (Annual Percentage Rate)?
APR represents the yearly interest rate charged to borrow money, or the rate you earn before compounding if you lend it. It includes interest and certain fees, helping you understand the total cost of credit.
APR is widely used in credit cards, personal loans, mortgages, and auto financing. For example, if your credit card has an 18% APR, you’ll pay 18% interest on any carried balance. Fixed-rate loans maintain the same APR, while variable-rate loans fluctuate with market conditions and Federal Reserve changes.
Example: Borrow $10,000 at 10% APR for one year. You’ll owe $1,000 in interest. Simple and transparent, without compounding surprises.
What Is APY (Annual Percentage Yield)?
APY measures how much your money grows over a year, including compounding. It reflects how often your interest is added to your balance (daily, monthly, or annually) which then generates more interest.
This is the standard metric for savings accounts, money market accounts, and certificates of deposit (CDs). Banks and digital financial platforms often advertise APY because it paints a more complete picture of earning potential.
Example: Deposit $10,000 in an account with a 5% APY, compounded monthly. After one year, your balance grows to $10,511, slightly higher than a flat 5% APR return.
The more frequent the compounding, the greater the growth, especially important in DeFi protocols that compound every few minutes.
APR vs APY in Different Financial Products
Credit Cards and Loans (APR)
When borrowing, APR helps you understand the true borrowing cost. For instance, if a mortgage advertises a 6.5% APR, that includes both the interest and certain closing costs.
Car loans, student loans, and credit cards use APR to keep comparisons straightforward across lenders. The key? Lower APR = less expensive borrowing.
Savings and Investment Accounts (APY Focus)
If your goal is wealth building, APY is your guide. A high-yield savings account with 4.5% APY grows faster than one with 4% because compounding quietly amplifies returns.
For certificates of deposit (CDs) or fixed deposits, APY helps you compare the real impact of compounding frequency.
Cryptocurrency and DeFi (Both APR and APY)
In crypto lending, staking, or yield farming, both metrics appear and can be easily confused.
- APR shows base rewards (without compounding).
- APY assumes you’re constantly reinvesting.
Example: A DeFi pool may show 100% APR, but with daily compounding, it becomes 171% APY. The key is understanding how often you can claim rewards and whether gas fees make compounding worthwhile.
How to Calculate APR vs APY
To compare offers correctly, you can calculate one from the other:
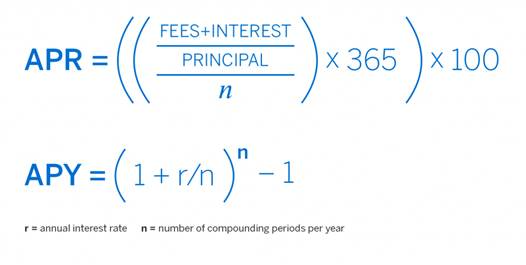
Example: 12% APR compounded monthly
APY = (1 + 0.12/12)^12 - 1 = 12.68%
Compounding more frequently increases APY slightly each time.
Which Should You Focus On?
- If you’re borrowing, prioritize APR. It reflects the total cost of debt.
- If you’re saving or investing, look at APY. It shows how compounding boosts earnings.
- In crypto, check both. APR tells you the base reward, APY reveals potential if you reinvest.
When comparing offers, always read the fine print; frequency, fees, and conditions can shift the real value dramatically.
Common Misconceptions and Pro Tips
Myth: “APY is always better.”
Reality: Only if compounding happens, or if you reinvest earnings.
Myth: “APR ignores compounding, so it’s useless.”
Reality: APR helps borrowers compare costs clearly.
Pro Tip: Use online APR-to-APY calculators for quick comparisons. They’re free and eliminate guesswork.
The Bottom Line
APR and APY aren't just different ways of saying the same thing, they represent two different approaches to measuring returns.
When you see APR, you're looking at simple interest calculated over a year. When you see APY, you're seeing what happens when earnings get reinvested and compound over time. Both are valid measurements, just showing different scenarios.
This distinction becomes more noticeable with higher interest rates. A 50% APR becomes closer to 65% when compounded daily. The higher the base rate, the bigger the difference between these two numbers becomes.
Understanding which one you're looking at helps you compare options accurately. APR gives you the base rate, while APY shows the potential with compounding factored in.
Once you get the hang of spotting the difference, those financial offers suddenly make a lot more sense. No more squinting at numbers wondering why similar-sounding deals seem to work out so differently. It's like finally understanding why some recipe measurements are in cups and others in ounces - same concept, different scales, and knowing which is which makes all the difference.

October is off to a strong start. The total market capitalization has once again crossed the $4 trillion threshold, fueled by fresh highs in Bitcoin (BTC) and renewed optimism around altcoins. But beneath the surface, whale wallets (i.e. those holding tens or hundreds of millions in crypto) are making strategic moves that could define market direction this month.
On-chain data paints a picture of accumulation, profit-taking, and rebalancing across top assets. Let’s take a closer look at what these whales are doing, and why their moves matter.
1. Bitcoin (BTC): Holding Strong
Bitcoin remains the market anchor, and its rise above $125,000 has been both a catalyst and a cash-out moment for many whales.
One wallet (3NVeXm) transferred 1,550 BTC (~$193.75 million) to Binance shortly after BTC set a new all-time high, while an address linked to Alameda Research moved another 250 BTC ($30.1 million), likely for liquidation or reallocation.
Despite these outflows, institutional interest has remained exceptionally strong. According to BitcoinTreasuries, corporate holdings continue to climb:
- Metaplanet added 5,268 BTC,
- Marathon Digital accumulated 373 BTC,
- CleanSpark added 308 BTC, and
- MicroStrategy increased by 196 BTC.
In total, the top 100 public companies now collectively hold over 1 million BTC, reinforcing Bitcoin’s role as the primary institutional asset in the digital market.
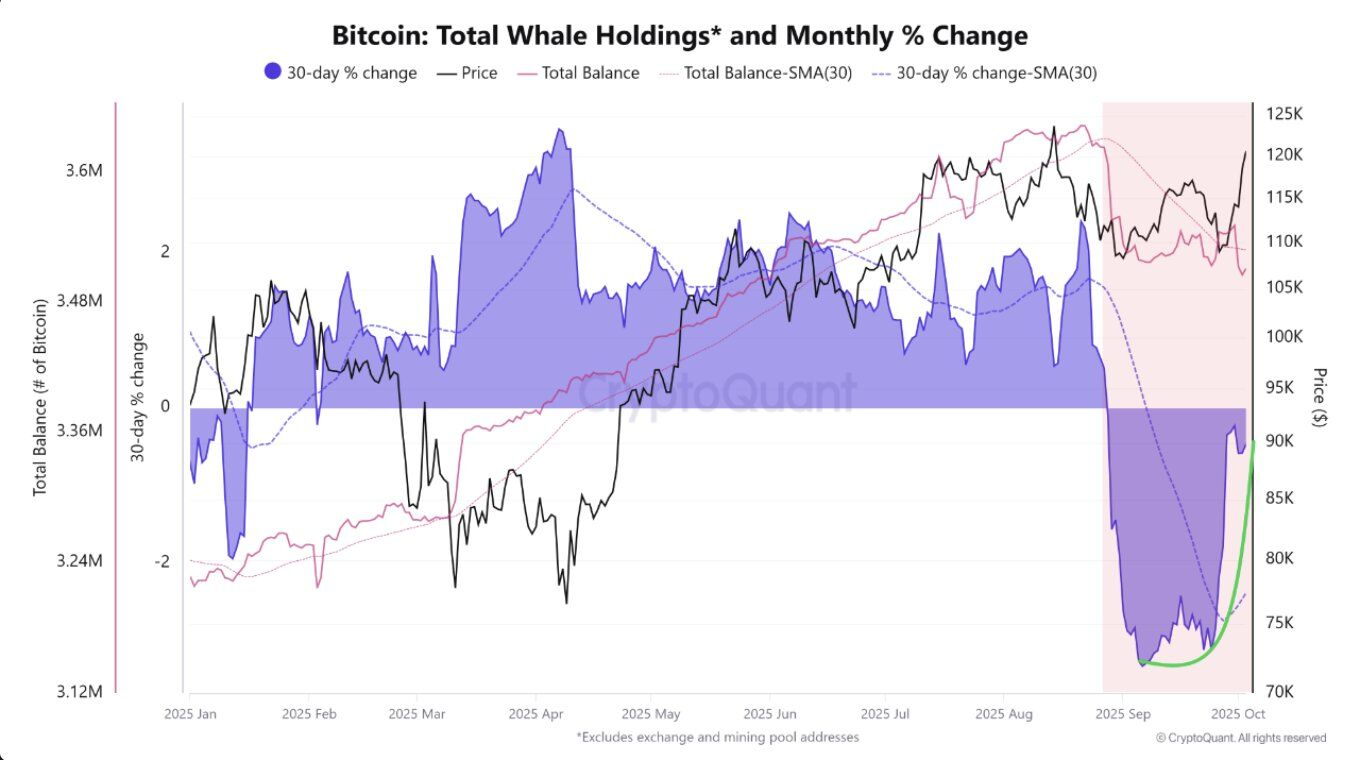
Moreover, whale selling pressure appears to be easing since late September. This sharp decline follows weeks of heavy selling activity, signaling that major holders may be positioning for a reinvigorated accumulation phase.
2. Altcoins: Strategic Bets Across the Board
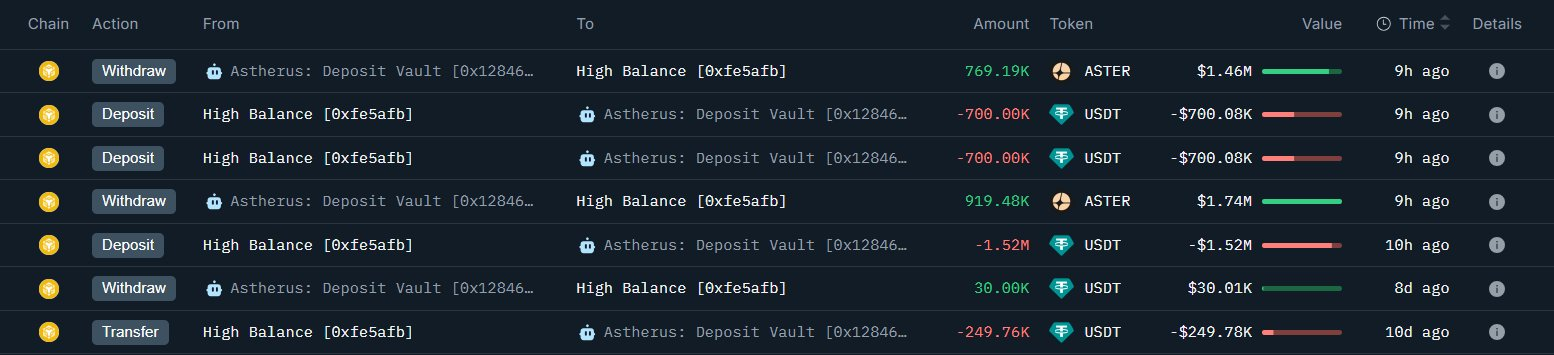
Beyond the majors, whales seem to be placing their bets across select altcoins, particularly ASTER, ONDO, and Chainlink (LINK).
A single wallet recently accumulated 1.69 million ASTER tokens (~$3.14 million at the time of writing), while a Gnosis Safe Proxy address moved 11.67 million ONDO (~$10.8 million) into exchanges. Of that, 3.89 million ONDO was sent to a Bybit address linked to Arthur Hayes, suggesting that whales could be anticipating volatility or looking to trade around liquidity spikes.
Meanwhile, Arkham Intelligence flagged a whale deposit of 700,000 LINK (~$15.5 million) to Binance. Together, these moves suggest whales are diversifying their positions, betting selectively on tokens with strong ecosystems.
3. Ethereum (ETH): Accumulation Meets Opportunity
Ethereum has been one of the standout performers so far this month, reclaiming the $4,500 level. This rebound has coincided with heightened whale activity.
Blockchain analytics firm OnChain Lens tracked a new wallet, 0x982, that received 26,029 ETH (around $116.8 million) from Kraken before transferring the tokens into Aave for lending. Another whale, 0xa312, took 8,695 ETH (about $39.5 million) from Binance, a classic sign of long-term accumulation.

At the same time, Trend Research, a known institutional wallet, has been taking profits, sending 77,491 ETH (~$354 million) to Binance. Since October began, the firm has reportedly offloaded over 143,000 ETH, showing that even smart money is locking in gains after the rally.
Interestingly, several dormant Ethereum wallets have reactivated. An old whale (0xf97) deposited 4,500 ETH (~$20.4 million) after two years of inactivity. Two others sent funds to exchanges after four years, suggesting older holders may be using recent price strength to exit.
The Bigger Picture: Whales Drive the Waves
Whale movements are often leading indicators of market trends. Their accumulation patterns tend to precede rallies, while large exchange inflows often signal local tops. This “Uptober”, on-chain behavior shows a split strategy, whales are booking profits on rallies while continuing to deploy capital. However, data seems to lean more in favor of accumulation.
Such behavior aligns with a maturing market. Rather than chasing hype, whales appear to be rotating strategically, reinforcing assets with clear narratives, like Ethereum’s staking yields, Bitcoin’s institutional legitimacy, and select altcoins with vibrant communities and strong real-world use cases.
Watching these whale flows can provide valuable context. When the biggest wallets start moving, it’s rarely random.. and it never goes unnoticed.

From Comedy Gold to Digital Ghost Town
Memecoins were once the beating heart of retail-driven speculation in cryptocurrency markets. From Dogecoin's Elon Musk-fueled rallies to the lightning-fast ascent of tokens like Shiba Inu and Pepe, these internet-born digital assets transformed online jokes into substantial market capitalizations, at least for those who managed to time the hype cycles correctly. But moving into late 2025, the atmosphere has shifted dramatically. Prices have experienced significant declines, trading liquidity has diminished considerably, and the frenzied enthusiasm that characterized previous market cycles appears to be a distant memory.
The question facing the cryptocurrency community now is whether memecoins represent a fading trend from the previous bull market, or whether they still retain potential for unexpected resurgence, like many internet phenomena before them.
When Chaos Became Currency: The Memecoin Genesis
The emergence of memecoins remains inseparable from broader internet culture and social media dynamics. Unlike Bitcoin or Ethereum, which originated from detailed technical documentation and comprehensive visions for decentralized finance, memecoins typically began as internet humor, sustained by community engagement, viral content, and grassroots enthusiasm.
Dogecoin, widely recognized as the original memecoin, launched in 2013 as a deliberate parody of cryptocurrency speculation. Despite its humorous origins, it eventually achieved a multi-billion-dollar market capitalization through sustained community support and high-profile endorsements by the likes of Elon Musk. This success established a template that numerous subsequent projects attempted to replicate, often promising rapid returns without substantial underlying fundamentals.
During the market cycles of 2021 and 2024, memecoins transcended their status as mere digital assets to become cultural phenomena. Social media platforms amplified hype cycles exponentially, and retail traders participated en masse, with some small initial positions growing into substantial returns. However, as with most speculative market movements, the inevitable correction followed the euphoric peaks.
The Great Memecoin Correction of 2025
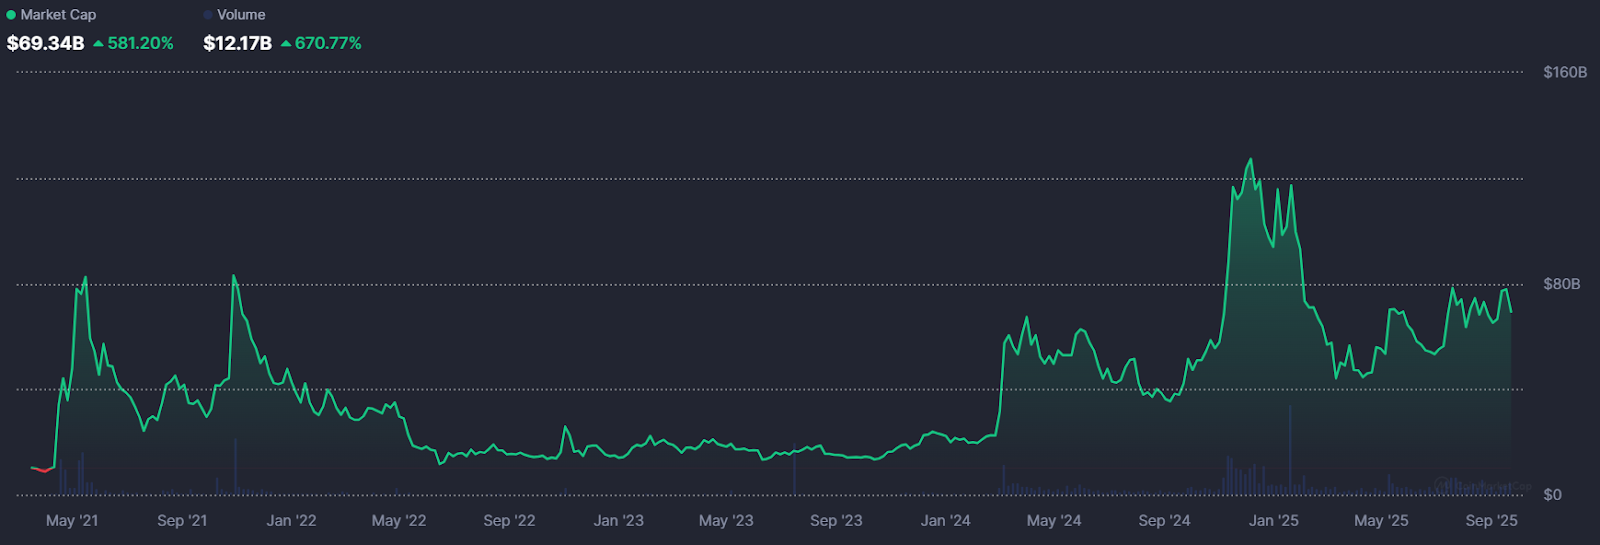
Since the speculative peaks of late 2024, memecoin markets have experienced sustained downward pressure. Market capitalizations that previously reached tens of billions of dollars have retraced by 60-90% across the sector. Data from CoinMarketCap indicates that aggregate memecoin market capitalization has declined from over $120 billion in December 2024 to just under $70 billion as of the time of writing, with many individual tokens experiencing severe liquidity constraints.
This market correction has highlighted the fundamental challenge facing the memecoin sector: without strong technological foundations or clear utility cases, these assets depend almost entirely on viral attention and consistent liquidity inflows. When these supporting factors diminish, price performance typically follows suit.
Many retail participants who entered positions near market peaks now hold assets that may not recover their previous valuations, and the collective market enthusiasm that previously drove exponential price increases has largely dissipated.
It Was Funnier the First Time Around: Why Most Memes Don't Make It
One primary factor contributing to memecoin market instability is what market analysts describe as the flash flood phenomenon. Cryptocurrency hype cycles don't typically develop gradually. They tend to surge rapidly and intensively, overwhelming normal market dynamics. However, this attention often disappears just as quickly, leaving limited lasting impact.
This dynamic creates a predictable pattern that most memecoins follow:
- Viral launch accompanied by community-driven price appreciation
- Explosive price movement that attracts new buyers
- Rapid attention fatigue as focus shifts to newer projects
- Market collapse within weeks or months
Some Memes Never Get Old: What Separates Winners from Losers
What distinguishes long-term survivors like Dogecoin and Shiba Inu, which maintain ongoing recognition, from the thousands of forgotten tokens? Market analysts describe this as the authority gap: the difference between temporary viral attention and sustained market credibility.
Successful memecoins typically manage to establish cultural relevance or practical utility that extends beyond initial market mania. Dogecoin has maintained its position as an internet cultural staple with a dedicated holder base and continued mainstream references. Shiba Inu expanded its ecosystem to include staking mechanisms and decentralized applications, positioning itself closer to legitimate alternative cryptocurrencies.
Without these elements, even the most viral initial launches tend to fade into market obscurity. The underlying meme concept alone appears insufficient for long-term sustainability, projects must develop narratives that communities and market participants can support even after speculative excitement subsides.
Could Lightning Strike Twice?
Despite current market pessimism, not everyone believes memecoins have reached their final conclusion. Market observers like Darkfost suggest that memecoin dominance within the broader alternative cryptocurrency market is approaching levels historically associated with trend reversals.
The memecoin dominance ratio, which compares memecoin market capitalization to other alternative cryptocurrencies, has been trending near technical support levels that previously marked significant turning points. If speculative capital rotates back toward high-risk digital assets, which is a common occurrence during liquidity-driven bull markets, memecoins could potentially experience another explosive growth phase.
The underlying logic remains straightforward: speculative capital typically seeks volatility opportunities, and few digital asset categories provide volatility comparable to memecoins. For market participants willing to accept associated risks, the possibility of disproportionate returns continues to exist.
The Many Pitfalls of Memeland: The Risks Never Go Away
Even assuming a potential market rebound, memecoins remain among the highest-risk positions within cryptocurrency markets. Unlike Bitcoin, which has established scarcity characteristics, or Ethereum, which powers decentralized application ecosystems, most memecoins lack intrinsic utility propositions. Their market value remains almost entirely dependent on narrative and sentiment factors.
This dynamic means that timing becomes critically important. Market participants who enter positions early and exit strategically can potentially achieve remarkable returns. However, hesitation often converts profitable positions into losses, as exponential rallies frequently reverse with minimal advance warning.
For newcomers to this market segment, the implications are clear: memecoins may provide entertainment and occasional opportunities, but they should not constitute foundational portfolio elements. Effective risk management practices, and the willingness to accept complete capital loss, remain essential when stepping into Memeland.
Curtain Call or Just Intermission?
So has the meme coin era truly concluded? The answer isn’t simple. Examining the thousands of failed token projects, the sector certainly resembles a digital graveyard. Most projects were never designed for long-term sustainability, and their decline represents the natural consequence of speculative excess.
Yet historical patterns suggest caution in declaring memecoins permanently finished. Their cyclical nature, driven by internet culture and speculative market dynamics, indicates they often resurface when liquidity conditions and risk appetite shift favorably. Whether through traditional meme-based narratives or emerging AI-enhanced strategies, future market cycles could still produce unexpected developments.
For market participants, the key takeaway remains consistent: memecoins are not traditional financial assets. They represent speculative instruments capable of both extraordinary gains and losses. The underlying joke isn’t over… but anyone who’s still in on the joke should remain prepared for the punchline.

Bitcoin and Ethereum dominate headlines, but they represent just one approach to distributed ledger technology. While most projects iterate on blockchain's foundational concepts, Hedera Hashgraph (HBAR) takes a different approach, pursuing an entirely different architectural philosophy.
The result is a network engineered for enterprise-grade performance - processing thousands of transactions per second with deterministic fees and minimal energy consumption. Where many blockchain networks struggle with the scalability trilemma, Hedera's hashgraph consensus mechanism offers a compelling alternative that doesn't sacrifice security for speed.
What distinguishes Hedera in practice is its enterprise adoption trajectory. Major corporations across finance, healthcare, and supply chain management have moved beyond pilot programs to production deployments. This isn't theoretical adoption - it's measurable network activity from organizations with serious compliance and performance requirements.
Hedera has positioned itself as one of the most corporate-friendly distributed ledger technologies (DLTs) available today. But how exactly does it work, and why does it stand apart from the blockchain crowd?
The Basics: What Is Hedera Hashgraph?
Launched in 2018, Hedera Hashgraph is a distributed ledger technology that offers a genuine alternative to blockchain architecture. Instead of organizing transactions into sequential blocks like a digital filing cabinet, Hedera uses a directed acyclic graph (DAG) structure called the hashgraph. Think of it more like a web of interconnected transactions.
This design allows multiple transactions to be processed in parallel rather than waiting in a single-file line. The result? Hedera can handle over 10,000 transactions per second (TPS) with finality in just a few seconds, while Bitcoin manages about 6–8 TPS and Ethereum handles 12–15 TPS.
At its core, Hedera is engineered to tackle three persistent challenges that have plagued distributed ledger technology:
- Transactions settle in seconds, not the minutes or hours you might wait with other networks. This makes it possible to build applications where timing actually counts.
- Scalability without the usual trade-offs, The network can handle thousands of transactions simultaneously without slowing down or getting expensive when things get busy. Most blockchains struggle with this balancing act.
- Energy use that makes sense, unlike networks that consume as much electricity as small countries, Hedera runs efficiently enough that companies don't have to justify massive energy bills to their boards.
How Hedera Works: Gossip and Virtual Voting
Hedera's performance stems from its unique consensus mechanism, which combines two clever innovations that work together like a well-orchestrated dance.
Instead of broadcasting every transaction to the entire network simultaneously (imagine shouting news in a crowded room), nodes "gossip" by randomly sharing information with a few neighbors. Those nodes then pass it along to their neighbors, creating a ripple effect. Over time, the entire network organically learns about every transaction without the communication overhead. That is known as the “gossip-about-gossip protocol”.
Virtual voting is where things get interesting: once all nodes have the same historical record of gossip, they can independently calculate how the network would vote on each transaction. No actual vote messages need to be sent across the network. The outcome is mathematically deterministic based on the gossip history, saving significant time and bandwidth.
Together, these methods achieve asynchronous Byzantine fault tolerance (aBFT), which represents one of the highest levels of security available in distributed systems. This means the network can reach consensus and continue operating even if up to one-third of nodes act maliciously or fail completely.
Governance: The Hedera Council
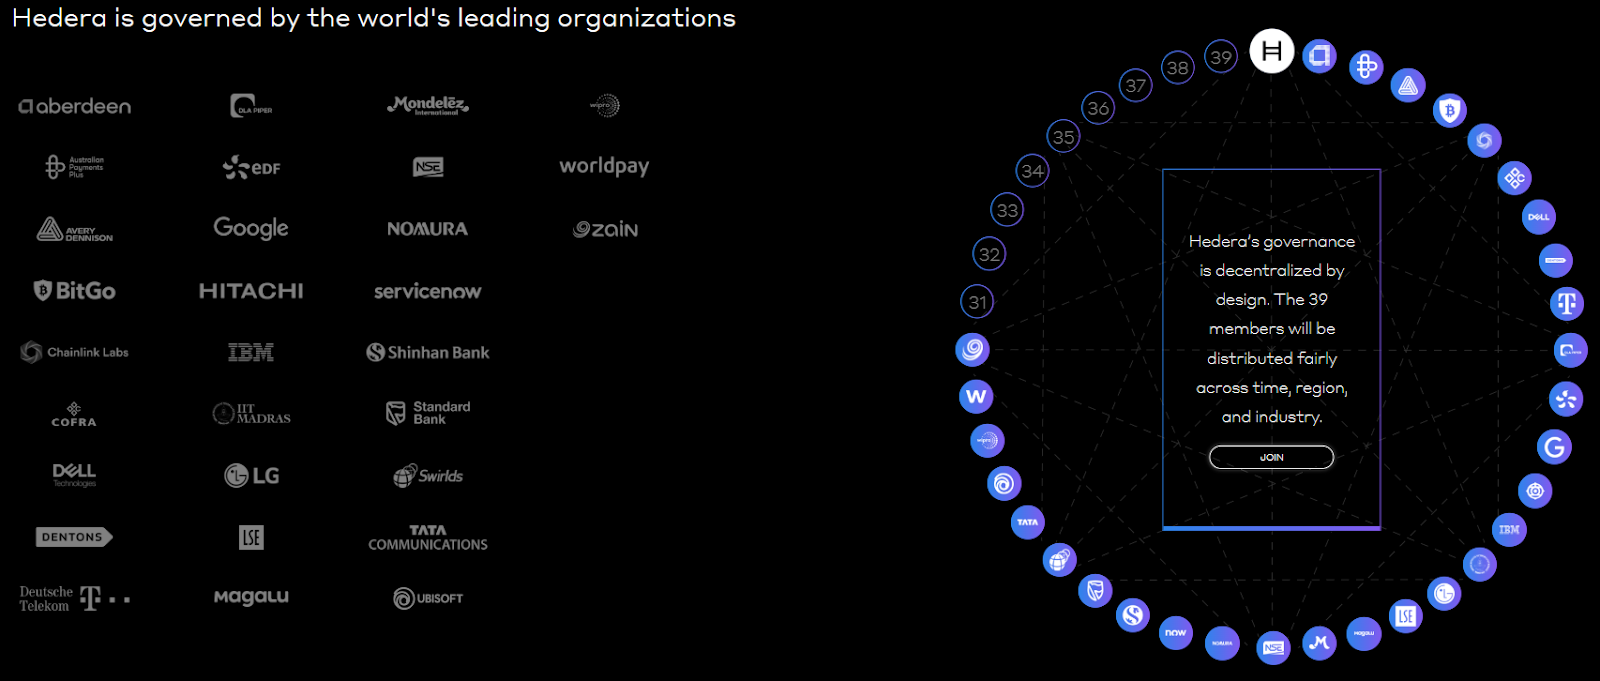
Perhaps the most controversial, and arguably the most distinctive, aspect of Hedera is its governance model. Instead of leaving critical network decisions to anonymous miners or distributed token holders, Hedera operates under a Governing Council of up to 39 well-known global organizations.
Current members include companies like Google, IBM, Dell, Boeing, Standard Bank, Ubisoft, and other established corporations. Each council member holds an equal vote on network decisions, including software upgrades, fee structures, and treasury management.
The rationale is straightforward: provide stability, accountability, and long-term strategic planning. However, this structure has sparked ongoing debate within the crypto community. Critics argue it reduces decentralization compared to blockchain networks where theoretically anyone can participate in governance, while supporters contend it offers the predictability that many enterprises require for serious adoption.
Key Services of Hedera
Hedera functions as more than just a payment network. The platform offers three core services that developers and enterprises can leverage to build decentralized applications:
Hedera Consensus Service (HCS): Provides secure, immutable logs of events and data. This proves particularly valuable for supply chain tracking, regulatory audits, and maintaining data integrity in heavily regulated industries like healthcare and finance.
Hedera Token Service (HTS): Enables the creation and management of various token types, including stablecoins, NFTs, and tokenized assets. Built-in features like account-level controls and compliance tools make it especially appealing for enterprises that need to meet regulatory requirements.
Hedera Smart Contract Service (HSCS): Supports Ethereum-compatible smart contracts, allowing developers to build DeFi applications, games, and automation tools while benefiting from Hedera's superior speed and substantially lower transaction fees.
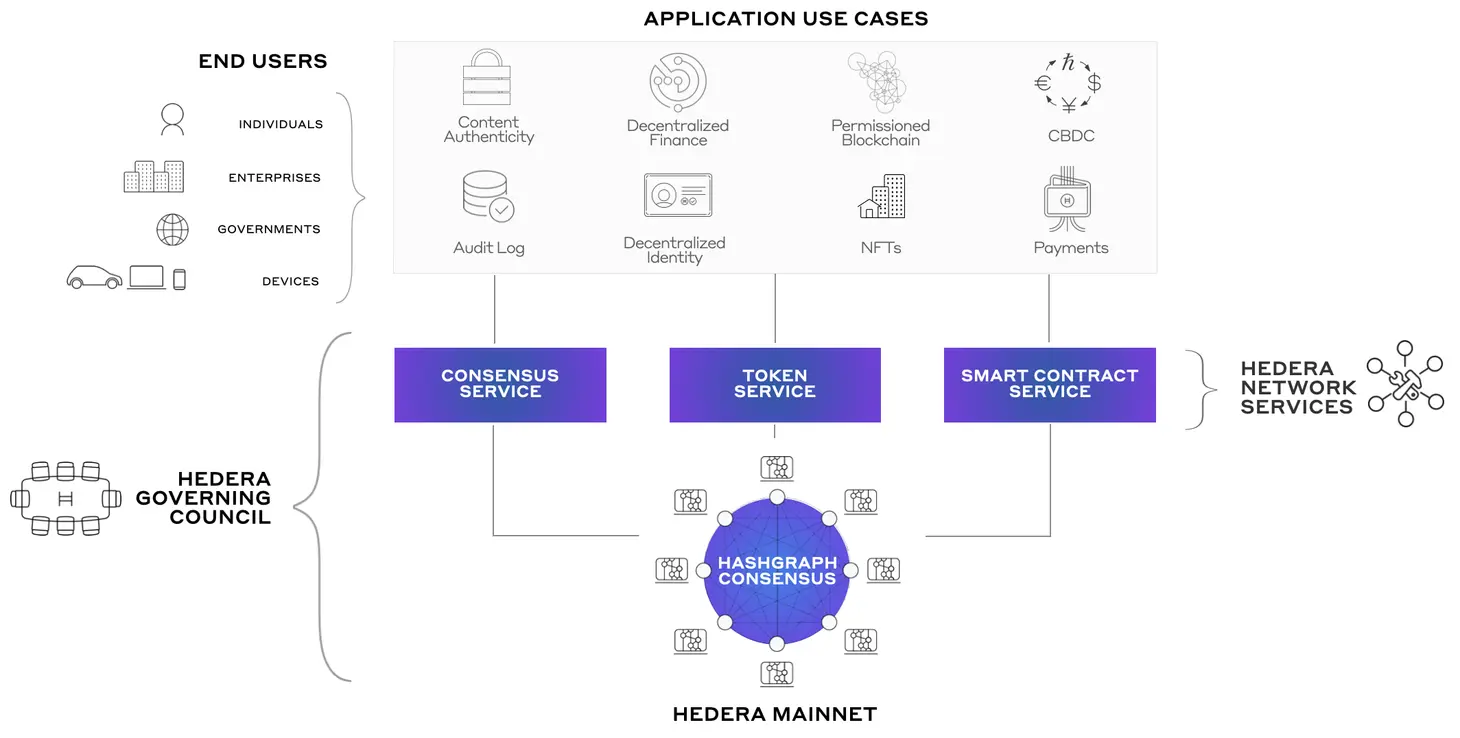
Real-World Applications
Hedera's enterprise-focused approach has translated into practical implementations across multiple sectors:
- Finance: Standard Bank leverages Hedera's infrastructure for faster, more transparent cross-border payment processing.
- Supply chain: Companies like Suku and Avery Dennison use Hedera for product traceability and logistics management, providing end-to-end visibility.
- Healthcare: Safe Health Systems employs the network to securely log medical and clinical trial data while maintaining strict patient privacy standards.
- Gaming: Animoca Brands integrates Hedera's technology to create fair and tamper-proof in-game economies and digital asset management.
- Sustainability: Environmental organizations use Hedera's consensus service to track carbon credits and monitor environmental impact data with immutable records.
These implementations highlight Hedera's positioning as an enterprise-focused platform, creating a distinct contrast to networks that primarily serve DeFi protocols or retail trading activities.
Understanding HBAR: The Native Token
Like most distributed ledger technologies, Hedera operates with its own native cryptocurrency: HBAR. The token serves two fundamental purposes within the ecosystem:
- Network fuel: HBAR is required to pay transaction fees and access network services, including consensus operations, tokenization features, and smart contract execution.
- Network security: Node operators stake HBAR tokens to participate in consensus and help secure the network infrastructure.
One of Hedera's most practical advantages lies in its cost structure. A typical transaction costs approximately $0.0001, it’s economical enough to enable microtransactions and machine-to-machine payment scenarios that would be prohibitively expensive on other networks.
The total supply of HBAR is capped at 50 billion tokens. The distribution follows a controlled release schedule designed to avoid sudden market flooding while ensuring adequate liquidity for network operations.
How Hedera Compares to Other Networks
To understand Hedera's market position, it's helpful to consider how it stacks up against established blockchain models:
Proof-of-Work (PoW), exemplified by Bitcoin, is highly secure and battle-tested, but notoriously slow and energy-intensive.
Proof-of-Stake (PoS), used by Ethereum 2.0, is more energy-efficient than PoW, but can lead to wealth concentration among large token holders.
Lastly, Hedera Hashgraph uses gossip protocols and virtual voting to achieve speed, security, and efficiency simultaneously, while operating under corporate governance rather than anonymous network participants.
The trade-off is crystal-clear. Hedera prioritizes corporate trust, performance, and regulatory clarity, while accepting criticism that it may sacrifice some degree of decentralization compared to traditional blockchain networks.
The Challenges Ahead
Despite its technical strengths and enterprise adoption, Hedera faces some hurdles that could impact its long-term trajectory. The Governing Council model continues to raise questions about whether Hedera represents genuine decentralization or simply distributed corporate control, a debate that matters deeply to the broader crypto community's acceptance. Meanwhile, established networks like Solana, Avalanche, and Ethereum maintain their dominance over ecosystem development, making it challenging for Hedera to attract the vibrant developer communities that drive innovation.
The platform also faces an adoption challenge. While it excels in enterprise use cases, Hedera could broaden its appeal beyond corporate applications to achieve the kind of recognition that sustains long-term growth. Moreover, like all cryptocurrency projects, Hedera must navigate evolving regulatory frameworks across multiple jurisdictions, each with their own compliance requirements and restrictions.
Nevertheless, Hedera's focus on performance, enterprise-grade reliability, and regulatory compliance could provide resilience in certain market conditions where other projects would struggle to maintain institutional confidence.
HBAR ETF on the Horizon
Over the past several months, talk of a potential HBAR ETF has gained traction. An ETF would offer institutional and retail investors exposure to HBAR without needing to manage wallets, private keys, or direct custody. That kind of access lowers the entry-level barrier. Moreover, SEC approval of a Hedera ETF would imply a level of oversight, due diligence, and compliance that can help reduce perceived risks among cautious or regulated investors. It puts HBAR closer to the realm of mainstream finance instruments.
The U.S. Securities and Exchange Commission (SEC) recently pushed back the decision on the Canary HBAR ETF to November 8. The ETF was proposed by Nasdaq back in February; the SEC has delayed the decision twice already. Despite the most recent delay, however, market analysts remain optimistic. Bloomberg’s analysts, for instance, maintain a 90% likelihood of ETF approval in the near term.
The Future of Hedera
Hedera stands out in a crowded field by taking a completely different approach than most blockchain projects. Instead of following the usual playbook, they built something that actually works for businesses: fast transactions, costs you can predict, and energy usage that won't make your CFO cringe.
The real test isn't whether Hedera can keep doing what it's doing well. It's whether they can stay relevant as the whole distributed ledger world keeps evolving at breakneck speed. But here's the thing: while everyone else was busy trying to be the next Bitcoin, Hedera quietly built something that Fortune 500 companies actually want to use.
Whether that bet pays off long-term is anyone's guess. What's not up for debate is that they've proven there's more than one way to build a distributed ledger, and sometimes the road less traveled leads somewhere pretty interesting.

Yield farming is a method to generate more crypto with your crypto holdings. The process involves you lending your digital assets to others by means of the power of computer programs known as smart contracts.
Cryptocurrency holders have the option of leaving their assets idle in a wallet or binding them into a smart contract to assist with liquidity. Yield farming allows you to benefit and gain rewards from your cryptocurrency without spending any more of it. Sounds quite easy, right?
Well, hold on because it isn't that straightforward and we are just getting started.
Yield farmers employ highly advanced tactics in order to improve returns.
They constantly move their cryptocurrencies among a variety of lending markets in order to optimize their returns. After a quick Google search, you would wonder why there isn't more content surrounding strategies and why these yield farmers are so tight-lipped about the greatest yield farming procedures.
Well, the answer is quite simple: the more people are informed about a strategy, the less effective it becomes. Yield farming is the lawless territory of Decentralized Finance (DeFi), where farmers compete for the opportunity to grow the highest-yield crops.
As of November 2021, there is $269 billion in crypto assets locked in DeFi, gaining an impressive almost 27% in value compared to the previous month of October.
The DeFi yield farming rise shows that the excitement in the crypto market has extended far beyond community- and culture-based meme tokens and planted itself in the centre of the hype. What exactly does it take to be a yield farmer?
What kinds of yields can you anticipate? Where do you start If you're considering becoming a yield farmer? Here, we'll guide you through everything you need to know.
What is Yield Farming?
Also referred to as liquidity farming, yield farming is a method for generating profits using your cryptocurrency holdings instead of leaving them idle in an account on a crypto website. In a nutshell, it involves bidding cryptocurrency assets into platforms that offer lending and borrowing services and earning a reward for it.
Yield farming is similar to bank loans or bonds in that you must pay back the money with interest when the loan is due. Yield farming works the same way, but this time, the banks are replaced in this scenario by crypto holders like yourself in a decentralized environment. Yield farming is a form of cryptocurrency investment in which "idle cryptocurrencies" that would have otherwise been held on an exchange or hot wallet are utilized to provide liquidity in DeFi protocols in exchange for a return.
Yield farming is not possible without liquidity pools or liquidity farming. But, what is a liquidity pool? It's basically a smart contract that contains funds. Liquidity pools are working with users called liquidity providers (LP) that add funds to liquidity pools. Find more information about liquidity pools, liquidity providers, and the automated market maker model below.
How Does Yield Farming Work?
Liquidity pools (smart contracts filled with cash) are used by yield farming platforms to offer trustless methods for crypto investors to make passive revenue by loaning out their funds or crypto using smart contracts.
Similar to how people create bonds to pay off a house and then pay the bank interest for the loan, users can tap into a decentralized loan pool to pay for the bonds.
Yield farming is a type of investment that involves the use of a liquidity provider and a liquidity pool in order to run a DeFi market.
- A liquidity provider is a person or company who puts money into a smart contract.
- The liquidity pool is a smart contract filled with cash.
Liquidity providers (LPs), also known as market makers, are in charge of staking funds in liquidity pools enabling sellers and purchasers to transact conveniently by executing a buyer-seller agreement utilizing smart contracts. LPs earn a reward for providing liquidity to the pool. Yield farming is based on liquidity providers and liquidity pools, which are the foundations of yield farming. These work by staking or lending crypto assets on DeFi protocols to earn incentives, interest or additional cryptocurrency. It's similar to how venture capital firms invest in high-yield equities, which is the practice of investing in equities that offer better long term results.
Yield farmers will frequently shuffle their money between diverse protocols in search of high yields. For this reason, DeFi platforms may also use other economic incentives to entice more capital onto their platform as higher liquidity tends to attract more liquidity. The method of distribution of the rewards will be determined by the specific implementation of the protocol. By yield farming law, the liquidity providers get compensated for the amount of liquidity they contribute to the pool.
How Are Yield Farming Returns Calculated?
Estimated yield returns are calculated on an annualized model. This estimates the returns that you could expect throughout a year. The primary difference between them is that annual percentage rates (APR) don't consider compound interest, while annual percentage yield (APY) does. Compounding is the process of reinvesting current profits to achieve greater results (i.e. returns). Most calculation models are simply estimates. It is difficult to accurately calculate returns on yield farming because it is a dynamic market and the rewards can fluctuate rapidly leading to a drop in profitability. The market is quite volatile and risky for both borrowers and lenders.
Before Getting Started, Understand The Risks Of Yield Farming
Despite the obvious potential benefits, yield farming has its challenges. Yield farming isn't easy. The most successful yield farming techniques are quite complex, recommended only to advanced users or experts who have done their research.
Here are the different risks:
Smart contract
Smart contracts are computerized agreements that automatically implement the terms of the agreement between parties and predefined rules. Smart contracts remove intermediaries, are less expensive to operate and are a safer way to conduct transactions. However, they are vulnerable to attack vectors and bugs in the code.
Liquidation risks
DeFi platforms, like traditional finance platforms, use customer deposits to create liquidity in their markets. However, if the collateral's value falls below the loan's price, you would be liquidated. Collateral is subject to volatility, and debt positions are vulnerable to under-collateralization in market fluctuations.
If you borrow XX collateralized by YY a rise in the value of XX would force the loan to be liquidated since the collateral YY value would be inferior to the value of the XX loan.
DeFi Rug Pulls
In most cases, rug pulls are obvious exit scams that are intended to entice investors with a well-manufactured promising project in order to attract investors.
A crypto rug pull happens when developers create a token paired with a valuable cryptocurrency. When funds flow into the project and the price rises, developers then seize as much liquidity they can get their hands on resulting in losses for the investors left in.
Impermanent loss
Impermanent loss happens when a liquidity provider deposits their crypto into a liquidity pool and the price changes within a few days. The amount of money lost as a result of that change is what is called an impermanent loss. This situation is counter-intuitive yet crucial for liquidity providers to comprehend.
Exercise Caution When Getting Into Yield Farming
If you have no prior knowledge of the cryptocurrency world, entering into the yield farming production may be a hazardous endeavour. You might lose everything you've put into the project. Yield farming is a fast-paced and volatile industry. If you want to venture into yield farming, make sure you don't put more money in than you can afford, there's a reason why the United Kingdom has recently implemented serious crypto regulations.
What The Future Holds For Yield Farming
We hope that after reading this article you will have a much deeper understanding of yield farming and that it answered some of your burning questions.
In summary, yield farming uses investors' funds to create liquidity in the market in exchange for returns. It has significant potential for growth, but it's not without its faults.
What else might the decentralized financial revolution have in store for us? It's difficult to anticipate what future applications may emerge based on these present components. However, trustless liquidity protocols and other DeFi technologies are driving finance, cryptoeconomics, and computer science forward.
Certainly, DeFi money markets have the ability to contribute to the development of a more open and inclusive financial system that is accessible to everyone with an Internet connection.
Tease: October has often been unkind to XRP holders. But this year, shifting sentiment, institutional inflows, and a promising setup could finally change the story.
XRP is currently navigating a descending wedge pattern, a chart formation commonly seen as a bullish reversal setup. While past Octobers haven’t favored the token, shifting institutional behaviour and macro catalysts could make this October a turning point.
Demand Under the Surface
Even as price action remained mixed, institutional players kept showing up in September for XRP and other tokens. Total inflows surpassed $220 million, a strong sign that big money sees value despite volatility.
Exchange net positions support the holders’ case. Throughout much of the month, holders brought assets onto exchanges, suggesting short-term selling pressure. Yet in the last week, 439 million XRP were withdrawn from exchanges, a sign that confidence is returning, and fewer coins are available to be sold. This withdrawal trend by both retail and institutional holders indicates a shift from distribution to accumulation, potentially softening downside risk.

History Doesn’t Always Repeat
Historically, October has been a rough month for XRP. Over the past decade, it has averaged a –4.5% return, making it one of the weaker months for the token.
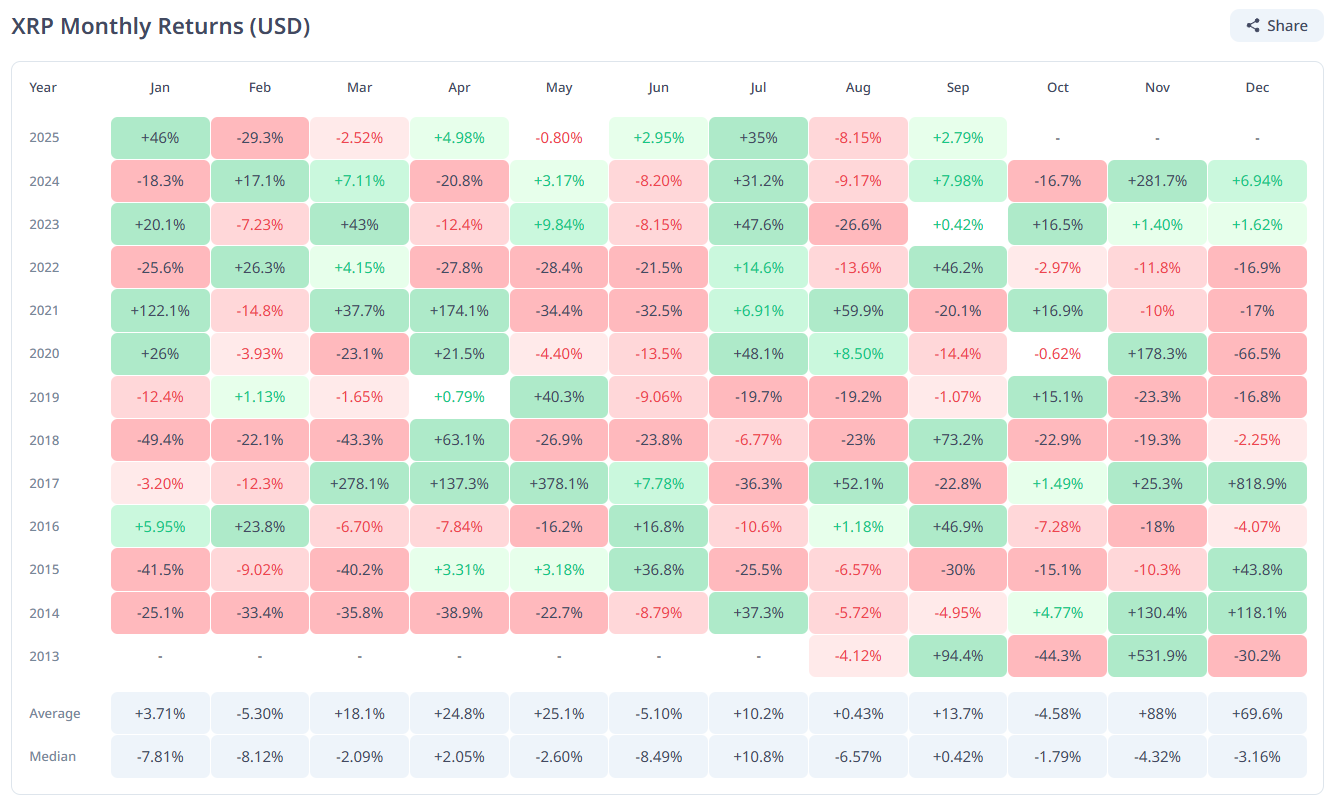
However, past patterns may not fully apply in 2025. It’s worth taking into account that past Octobers occurred during heavy regulatory uncertainty and before institutional infrastructure like ETFs existed. With those catalysts now in play, the usual October weakness may be less relevant this year.
The Price Game: Breakout or Breakdown?
XRP currently trades at around $2.90, trapped between the wedge’s resistance and support lines. A confirmed breakout above $3.02 could set the stage for a rally toward a new all-time high.
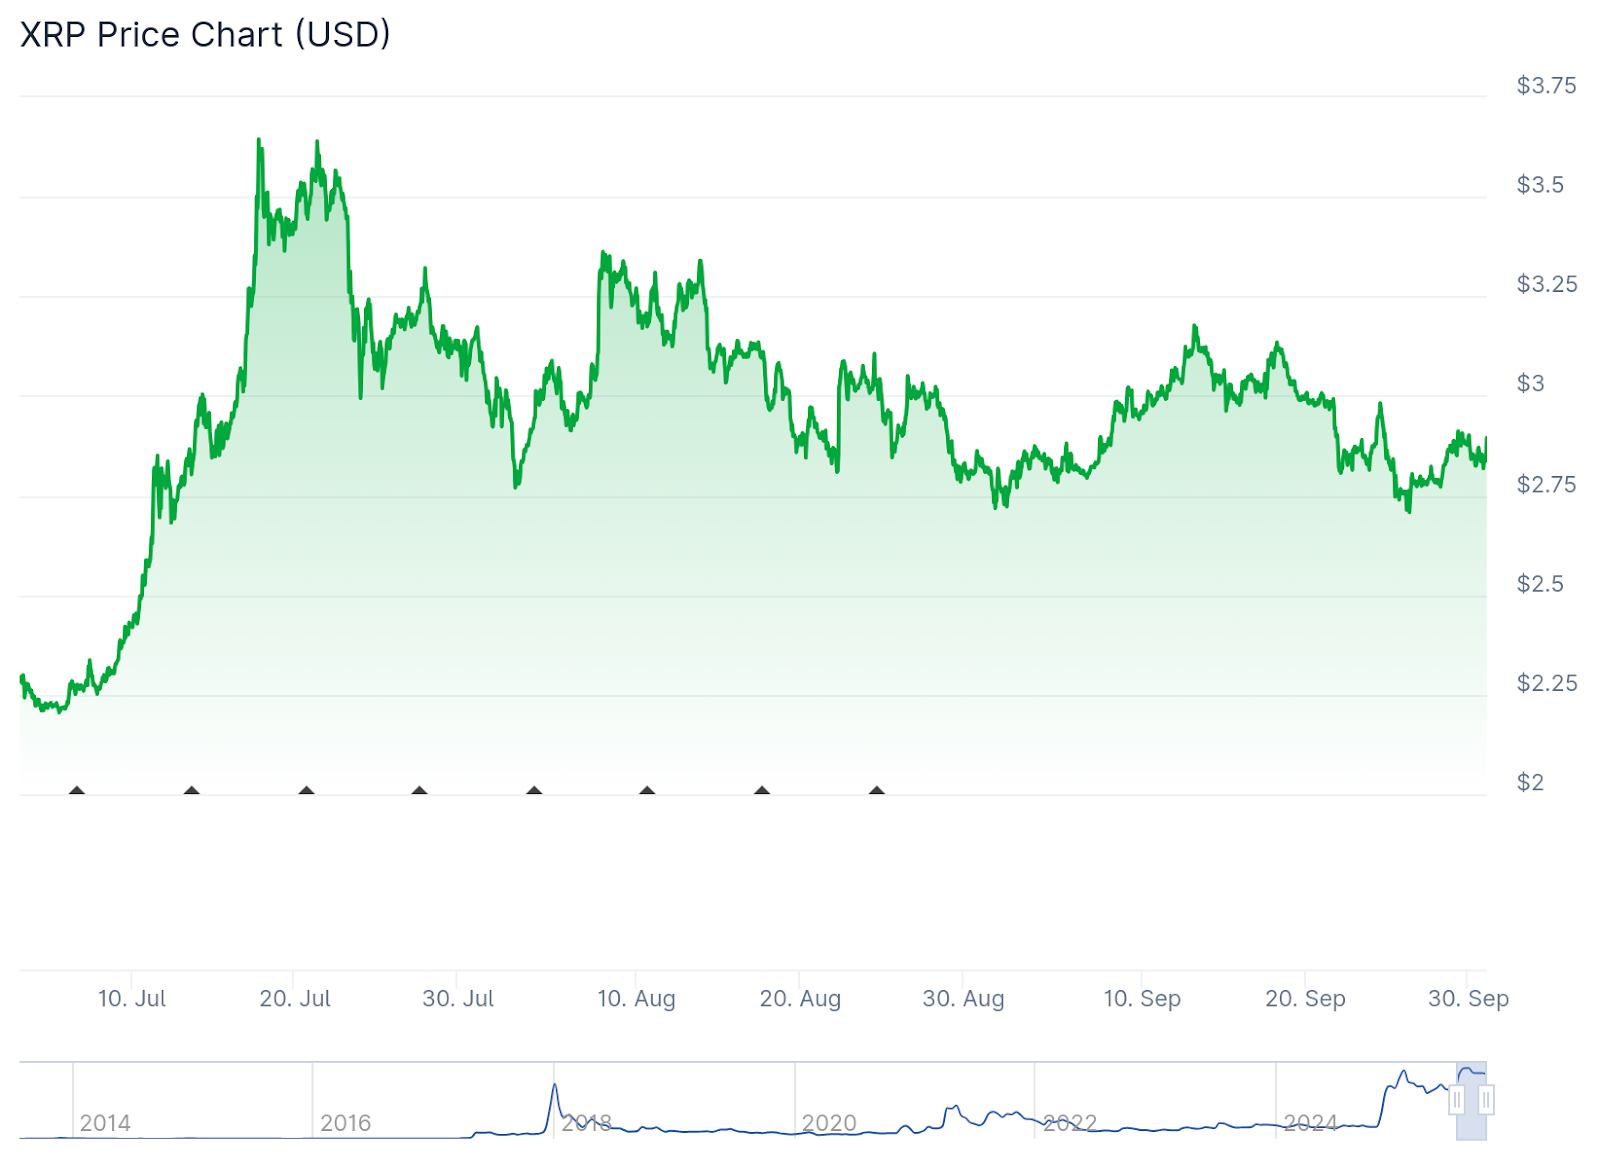
But those gains depend heavily on support levels holding firm and positive regulatory momentum. Should ETF approval chatter or institutional inflows accelerate, XRP could build enough momentum to push through resistance.
Still, risks are real. If the breakout fails, XRP could fall back to $2.75, or even lower, invalidating the bullish thesis and repeating October’s usual pattern of weakness.
What Traders and Holders Should Watch
- $2.75 level as key support, $3.02 as breakthrough resistance.
- ETF approvals or denials could act as volume catalysts.
- Fresh large withdrawals or cold-storage movements suggest longer-term conviction.
- Bitcoin’s strength or weakness often drag altcoins with it, XRP is no exception.
For beginners, this means October is a month to stay alert. For more seasoned traders, this wedge setup is looking like one of the cleaner setups in recent years. If it resolves upward, the upside could surprise some skeptics.
Turning Point
October has historically brought turbulence for XRP, but 2025 offers a different backdrop: institutional flows, ETF speculation, and stronger token infrastructure. The descending wedge pattern gives a clear roadmap. If resistance breaks, bulls may be rewarded; if not, the old October curse could strike again.
That said, XRP’s story is still being written. This month will test whether the narrative has shifted enough to rewrite past patterns. Either way, it’s absolutely shaping up to be an interesting ride.


.webp)


.webp)