
Learning the friendly way
Dive into our resources, guides, and articles for all things money-related. Grow your financial confidence with our experts curated tips and articles for both experienced and new investors.
LATEST ARTICLEs
.webp)
As Solana cements its place as one of the fastest-growing blockchains, the demand for powerful, reliable node infrastructure is skyrocketing. Running your own Solana node isn’t just about plugging into the network; it’s about unlocking earning potential, owning your data, and stepping behind the curtain to see how the ecosystem really works.
Whether you're a developer building apps or an investor looking to participate in network security, this guide will walk you through everything you need to know about setting up and running a Solana node.
Understanding Solana Nodes: types and benefits
What is a Solana Node?
A Solana node is a computer that participates in the Solana blockchain network by storing data, validating transactions, and maintaining network consensus. Think of it as your personal gateway to the Solana ecosystem that gives you direct, unfiltered access to blockchain data.
Validator vs RPC Nodes
Let’s first break down the difference between these two node options. What works best for you usually comes down to your interests, technical background, and what you want to get out of it.
Validator Nodes actively participate in consensus by voting on transactions and producing blocks. They require significant hardware resources and a stake of SOL tokens. Validators earn rewards for their participation but also face potential penalties (slashing) for malicious behaviour.
RPC Nodes serve data to apps and users without participating in consensus. They're easier to run, don't require staking, and are perfect for developers who need reliable blockchain data access for their apps.
Benefits of running a Solana Node
Running your own node offers the following advantages:
- Earning potential: Validators can earn up to 5-8% APY on staked SOL, while RPC nodes can in some case generate revenue through API access fees
- Network independence: No reliance on third-party providers that might have downtime or rate limits
- Data sovereignty: Complete control over your blockchain data access and privacy
- Learning opportunity: Deep understanding of blockchain infrastructure and Solana's architecture
- Network contribution: Help decentralise and secure the Solana network
Hardware requirements and costs
Getting the hardware right is obviously incredibly important for node performance. Before we get into that, let’s first introduce you to Agave.
Essentially, Agave is a validator client for Solana, providing the backbone of validator and RPC node software in the Solana ecosystem. Initially forked from Solana Labs, it now enables independent, optimised deployment and is central to the multi-client future of Solana.
If you’re thinking about running a validator or RPC node on Solana, Agave is the client you’ll most likely use (recommended by Solana).
In short: if you care about your node staying healthy, fast, and compliant with the Solana network as it evolves, you will likely use Agave.
Minimum vs recommended specifications
Here are the official Agave requirements:
CPU:
- Validator: 2.8GHz base clock or faster, 12 cores/24 threads minimum
- RPC Node: 16 cores/32 threads or more
- AMD Gen 3+ or Intel Ice Lake+ required
- AVX2 instruction support mandatory (AVX512f helpful)
- SHA extensions instruction support
RAM:
- Validator: 256GB minimum
- RPC Node: 512GB minimum (1TB recommended for full account indexes)
- ECC memory strongly suggested
Storage: PCIe Gen3 x4 NVMe SSD or better required for each:
- Accounts: 1TB+ with high TBW rating
- Ledger: 1TB+ with high TBW rating
- Snapshots: 500GB+ with high TBW rating
- OS: 500GB+ (SATA acceptable)
- Not recommended to store accounts and ledger on the same disk
Network: 1Gbps symmetric minimum, 10Gbps preferred for mainnet
Operating system: Ubuntu 24.04 (20.04 support ended May 2025)
Hosting options for Solana Validators
Validators don't necessarily need to be "hosted" by third-party providers - you have several options:
1. Self-hosted (own hardware)
- Buy and run your own server at home or in a private data centre.
- Pros: Full control, no recurring hosting fees.
- Cons: Requires enterprise-grade internet (1-10 Gbps), reliable power, security, and 24/7 monitoring.
2. Colocation hosting
- Place your hardware in a professional data centre.
- They provide: Power, cooling, internet, and physical security.
- You handle: Hardware upkeep, software, and monitoring.
- Cost: $100–$500/month + hardware.
3. Dedicated server hosting
- Rent servers from providers (Hostkey, Cherry Servers etc.).
- They provide: Hardware + data center services
- You handle: Validator setup and monitoring.
- Cost: €349–$1,800+/month (depending on service and location)
4. Cloud hosting (not recommended)
- AWS, GCP, and Azure are possible but discouraged for mainnet due to performance issues and higher operational complexity.
Official Solana documentation warns: "Running an Agave node in the cloud requires significantly greater operational expertise" and "Do not expect to find sympathetic voices should you choose this route."
Prerequisites and preparation
Before diving into the setup, ensure you have:
SOL requirements: For validators, you'll need a minimum stake (currently around 1 SOL for vote account rent, plus your desired stake amount). RPC nodes don't require staking.
Technical skills: Basic command-line experience, understanding of Linux systems, and familiarity with SSH connections.
Security setup: Strong passwords, SSH key pairs, and a plan for securing your validator keys.
Network planning: Ensure your internet connection meets bandwidth requirements and has minimal downtime.
Your step-by-step Solana Node setup guide
Phase 1: Local machine preparation
Step 1: Install Solana CLI on your personal computer
- Open terminal on your local machine (not the server)
- Download and run the Solana CLI installer from the official release page
- Verify installation by running the version command to confirm successful setup
Step 2: Create essential keypairs
- Generate validator identity keypair and save as validator-keypair.json
- Create vote account keypair (validators only) and save as vote-account-keypair.json
- Generate authorised withdrawer keypair and save as authorised-withdrawer-keypair.json
CRITICAL SECURITY: The authorised-withdrawer keypair controls your validator's funds. Store it securely offline using a hardware wallet, multisig, etc. Never store this file on your validator server.
Step 3: Configure CLI and create Vote Account (validators only)
- Set your CLI to use the appropriate network (testnet for learning, mainnet for production)
- Set the validator keypair as your default CLI keypair
- Fund the validator keypair with sufficient SOL for vote account creation and ongoing fees
- Create the vote account on the network using the three keypairs
Step 4: Secure the withdrawer key
- Backup the authorised-withdrawer-keypair.json to multiple secure locations
- Remove the withdrawer keypair from your local machine after backup
- Verify you can access your backups before proceeding
Phase 2: Server hardware setup
Step 5: Provision your server
- Set up a server meeting the hardware requirements (dedicated public IP essential)
- Install Ubuntu 24.04 on the system
- Ensure all drives are properly connected and recognised
Step 6: Initial server configuration
- Connect to your server via SSH
- Update all system packages to latest versions
- Install essential build tools and development packages
Step 7: Create dedicated user account
- Create a new user account (typically named "sol" or "solana") for running the validator
- Add the new user to the sudo group for administrative access
- Configure passwordless sudo for convenience (optional but recommended)
Step 8: Storage configuration
- Identify and format your NVMe drives for accounts, ledger, and snapshots
- Create mount points for each drive: /mnt/accounts, /mnt/ledger, /mnt/snapshots
- Mount the drives and set proper ownership to your validator user
- Configure automatic mounting in /etc/fstab to persist after reboots
Phase 3: System optimisation
Step 9: Network and firewall setup
- Configure UFW firewall to allow SSH (port 22) and Solana ports (8000-10000)
- Enable the firewall and verify rules are active
- Ensure your server has a dedicated public IP (NAT not recommended)
Step 10: Critical system tuning
- Create sysctl configuration file to optimise UDP buffers and memory mapping
- Set maximum open file descriptors and memory lock limits
- Configure systemd service limits for file handles and memory locking
- Create security limits configuration for the validator user
Step 11: Apply system changes
- Reload sysctl settings to apply network optimisations
- Restart systemd daemon to recognise new service limits
- Log out and log back in to activate user-level limit changes
Phase 4: Software installation
Step 12: Install Agave Validator Software
- Switch to your validator user account
- Download and install the Solana CLI and Agave validator binary
- Add the Solana binary path to your user's PATH environment
- Verify installation by checking version numbers
Step 13: Transfer keypairs to server
- Securely copy validator-keypair.json and vote-account-keypair.json to the server
- Set proper file permissions (read-only for validator user)
- Never transfer the authorised-withdrawer-keypair.json to the server
Step 14: Create validator startup script
- Create a bin directory in your validator user's home folder
- Write a startup script (validator.sh) with all necessary command flags
- Include paths to keypairs, mount points, network entrypoints, and optimisation flags
- Make the script executable and test it manually first
Phase 5: Service configuration and testing
Step 15: Test manual startup
- Run the validator startup script manually to verify it works
- Monitor the initial startup process and log output
- Check for any immediate errors or configuration issues
- Stop the manual process once confirmed working
Step 16: Create system service
- Create a systemd service file for automatic startup and management
- Configure the service to run as your validator user
- Set up automatic restart policies and logging configuration
- Enable the service for automatic startup on boot
Step 17: Verification and monitoring
- Start the validator service and monitor initial synchronisation
- Verify your validator appears in the gossip network
- For validators: confirm your vote account is visible in the validator list
- Set up log monitoring and performance tracking tools
Step 18: Final checks and go-live
- Verify all system resources are performing adequately
- Confirm network connectivity and peer connections
- For validators: ensure sufficient SOL balance for ongoing vote fees
- Set up monitoring alerts for downtime, performance issues, or errors
Phase 6: Ongoing operations
Step 19: Implement monitoring
- Set up Agave Watchtower or similar monitoring tools on a separate machine
- Configure alerts for validator downtime, performance degradation, or sync issues
- Implement automated restart procedures for common failure scenarios
Step 20: Establish maintenance procedures
- Create regular update procedures for Agave software releases
- Implement log rotation to manage disk space
- Set up backup procedures for configuration and keypairs (except withdrawer)
- Document troubleshooting steps for common issues
Profitability and economics
Earning potential
Validator Rewards: Current estimates suggest 5-8% APY on staked SOL, though this varies based on network conditions and your validator's performance.
RPC Revenue: Can generate income through API access fees, though this requires building a customer base.
Running a validator isn't without risks:
- Slashing: Poor performance can result in stake penalties
- Hardware costs: Equipment failures require immediate replacement
- Market volatility: SOL price fluctuations affect reward values
Break-even analysis
According to online forums, some operators claim to have broken even after 12-18 months, depending on initial hardware investment, operational efficiency, SOL price stability, and network reward rates.
Maintenance and best practices
Regular maintenance ensures optimal performance:
Updates: Keep Solana software current with network upgrades
Monitoring: Set up alerts for downtime, performance issues, or network problems
Backups: Regularly backup validator keys and configuration files
Performance tuning: Monitor CPU, RAM, and network usage to optimise settings
Conclusion and next steps
Running a Solana node can be rewarding both technically and financially in some cases, but it requires significant commitment and resources.
Be sure to consider your technical expertise, available capital, and long-term goals when deciding between self-hosting and alternative solutions.
For additional resources, consult the official Solana documentation and join the validator community on Discord for ongoing support and updates.
Paw-sitively Profitable
Back in 2013, Dogecoin (DOGE) launched as a tongue-in-cheek knock-off version of Bitcoin (BTC). It was inspired by Kabosu, an incredibly cute Shiba Inu dog that sadly passed away last year, though not without leaving an Instagram account full of posts to remember her by.

The picture that started the meme. Fundamentals… what? Look at this cute doggy. Source.
Fast forward to 2020, and Shiba Inu (SHIB) popped up as a parody of the parody. Both were brushed off as silly, short-lived plays… until they weren’t. In February 2021, a certain billionaire you might have heard of, called Elon Musk, drew attention to Dogecoin through a series of tweets. One could safely pinpoint that tweet spree as the origin of the memecoin bonanza.
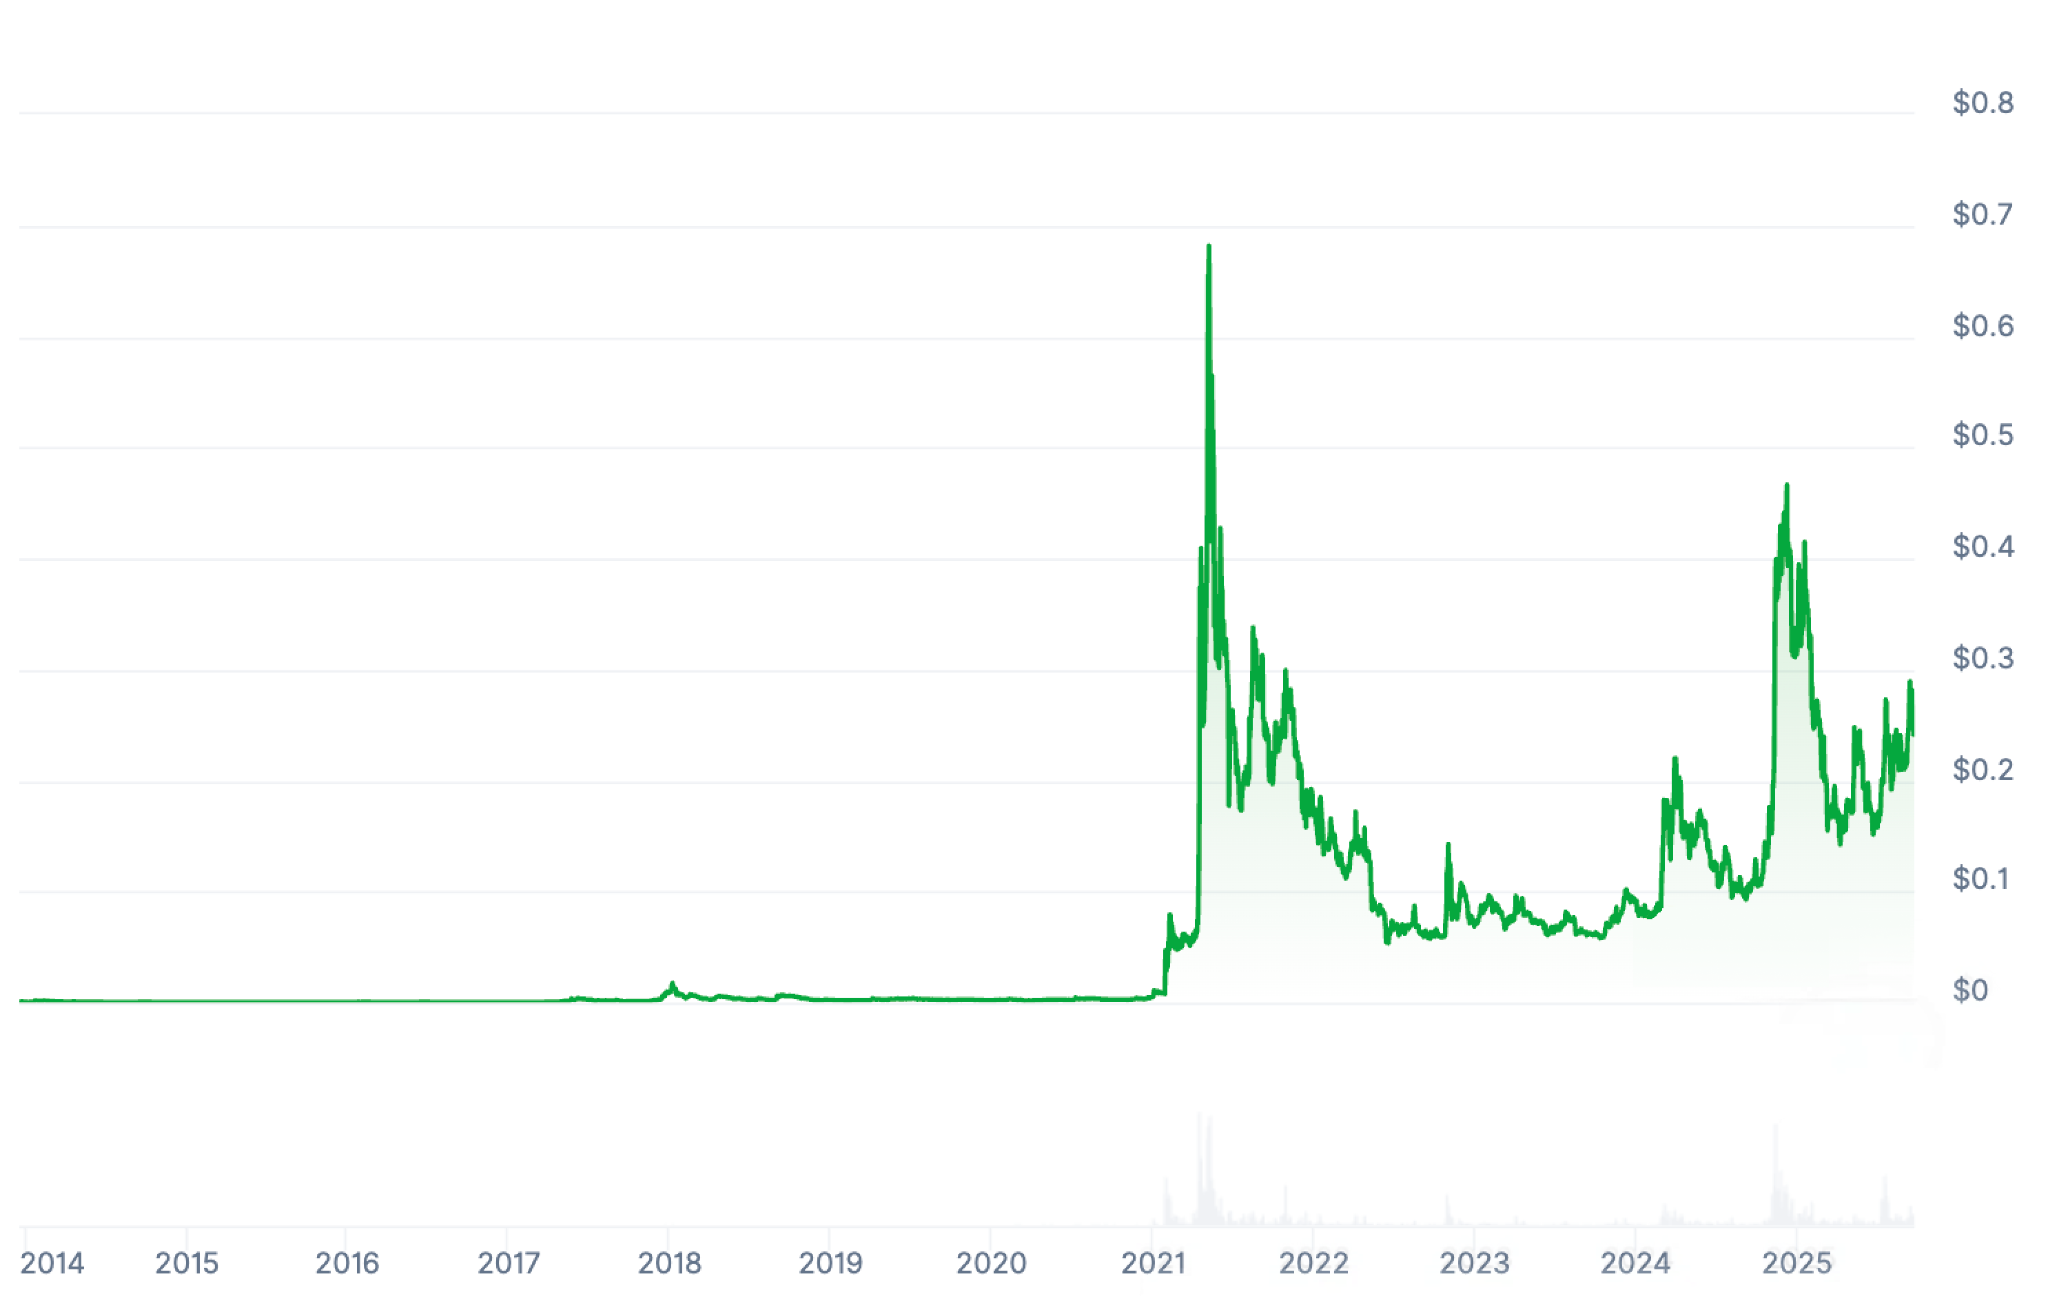
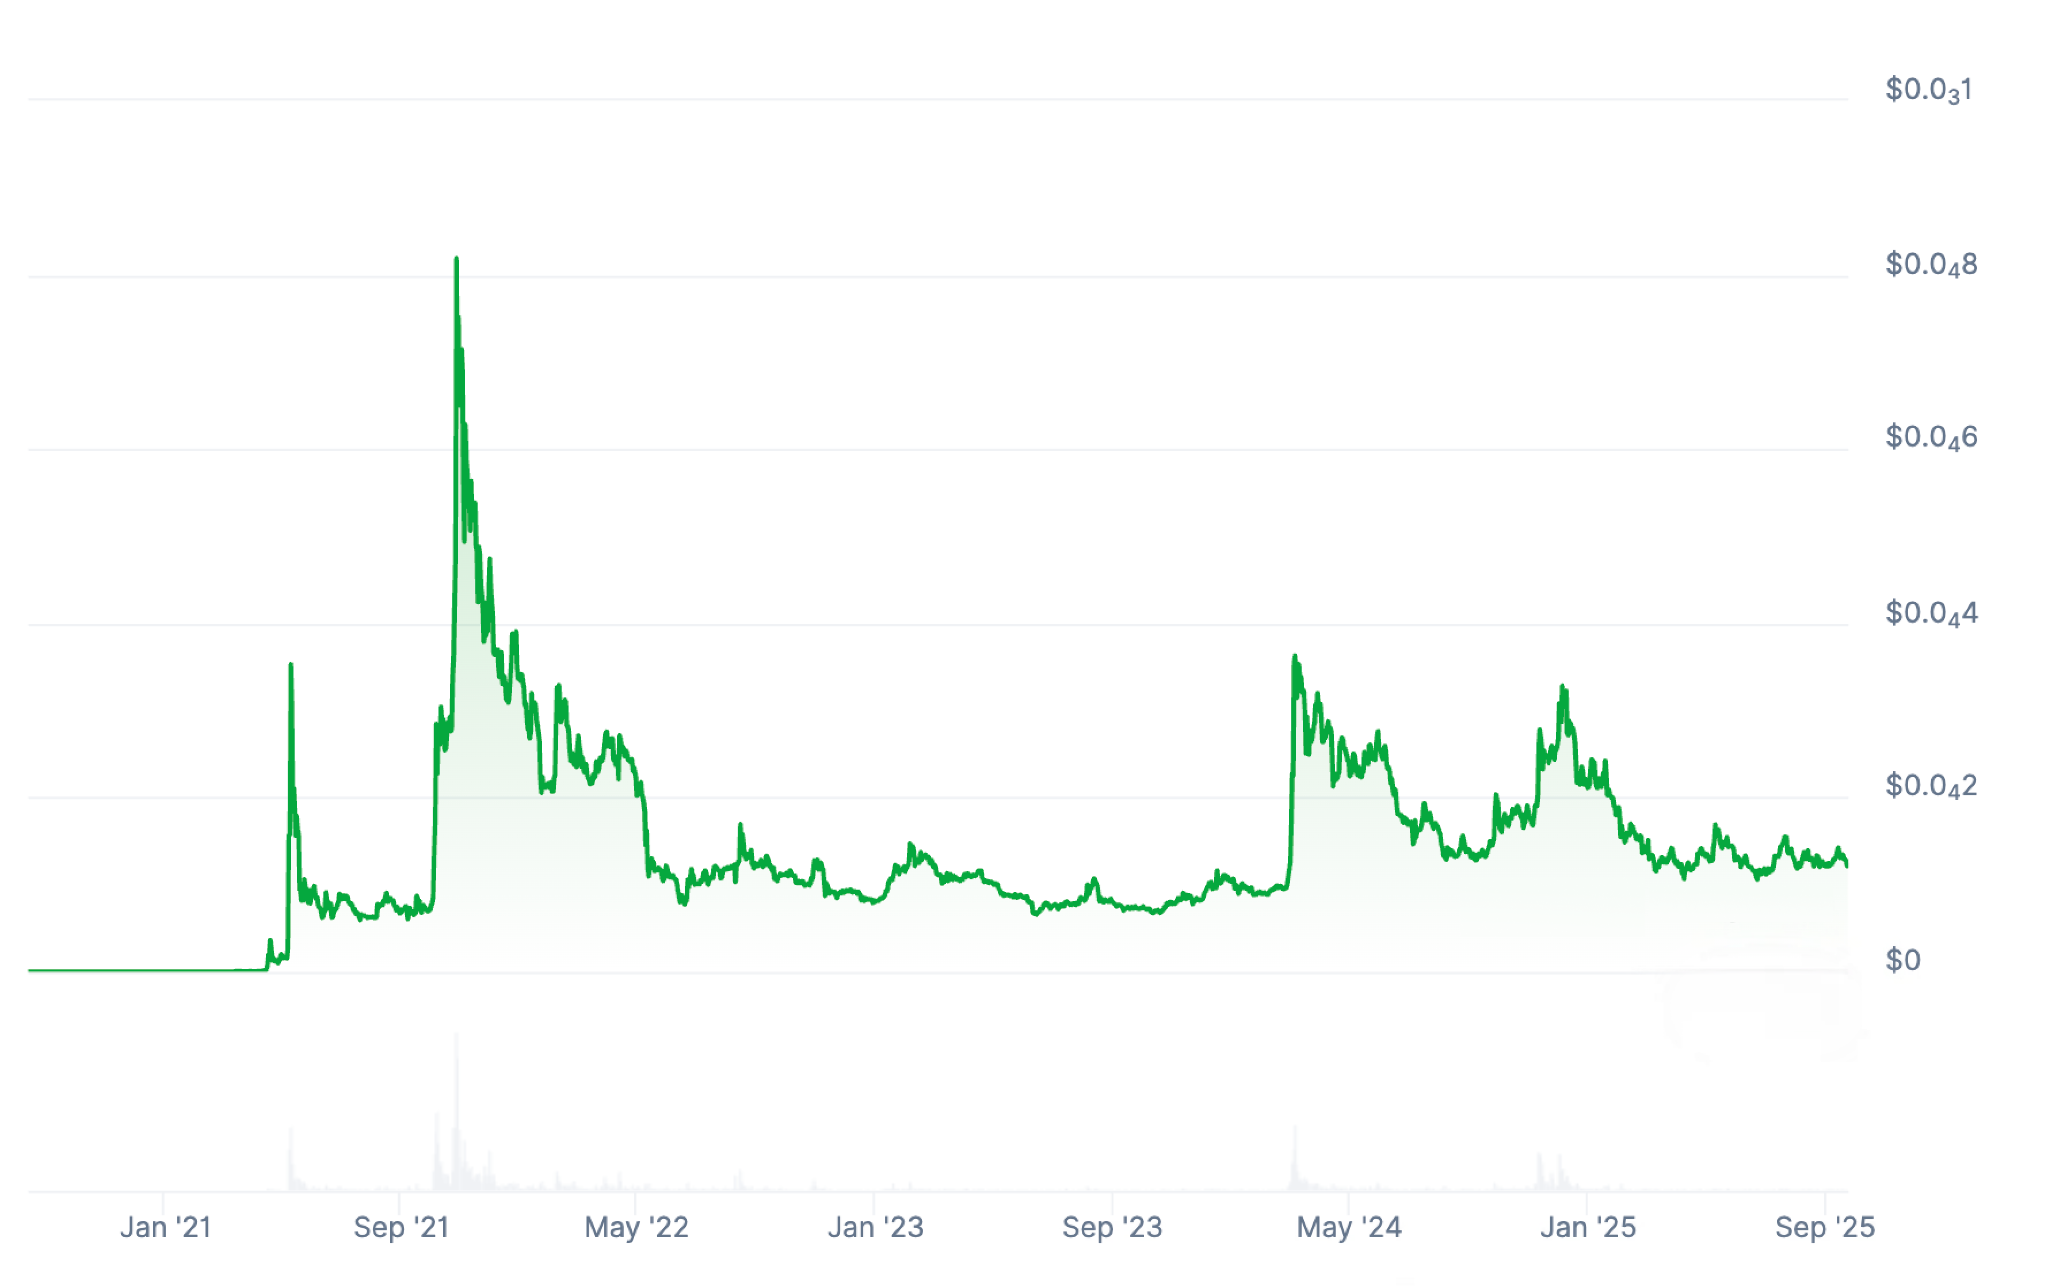
Now, let’s fast forward to September 2025. A $100 bet on Dogecoin at $0.0002 would be worth about $124,850 today. The same stake in Shiba Inu at launch? Nearly $25.5 million. Meme magic at its wildest.
For a time, Shiba Inu looked like the stronger contender thanks to its growing ecosystem. But 2025 has flipped the script: SHIB is up a good 24%, while DOGE barked its way to a massive 173% gain. Let’s dig into why.
Two Breeds of Dogs
Dogecoin runs on Litecoin’s proof-of-work code, meaning it still relies on miners. It’s inflationary, has no max cap, and uses Scrypt for faster, cheaper payments than Bitcoin. That’s given it a reputation as the “fun” payments coin.
And of course, the Musk effect can’t be ignored. Elon has championed DOGE in tweets, Tesla accepts it for select merch, and even the government’s Department of Government Efficiency was cheekily nicknamed DOGE. Very few coins, memes or not, can summon mainstream buzz the way Dogecoin can.
Shiba Inu, on the other hand, was built on Ethereum. It ditched mining for staking, is deflationary thanks to aggressive token burns (over 40% gone already), and plugs into Ethereum’s smart contract universe. That makes it more versatile than DOGE on paper.
In recent years, Shiba Inu rolled out Shibarium, a Layer-2 chain for speed and lower costs, and ShibaDEX, a cross-chain DEX. The project isn’t just riding a meme, it’s trying to build an ecosystem too.
The Dog Race Is on
For starters, both coins could ride a friendlier U.S. regulatory environment as crypto advocates step into power.
For Dogecoin, near-term ups include:
- Possible integration into Musk’s 𝕏 platform as a payments option.
- Wider retailer adoption.
- Network upgrades for scalability.
- And, of course, the constant wildcard of Musk’s next DOGE tweet.
Rumors of a Dogecoin ETF keep swirling too, which could inject serious momentum.
Shiba Inu’s playbook looks different:
- Ongoing Shibarium growth and new developer activity.
- Token burns that keep tightening supply.
- A developing metaverse with virtual land sales.
However, without a Musk-like hype machine, SHIB’s catalysts may not hit as hard.

Elon Musk’s first Dogecoin tweet, which started it all. Source.
So… Which Meme Coin Will Bark the Loudest?
Both coins are speculative, fueled as much by community buzz as fundamentals. Shiba Inu has a deeper ecosystem and long-term ambition. Dogecoin has clearer short-term sparks and, crucially, Elon Musk’s megaphone.
If forced to pick for the next 12 months, Dogecoin seems to have the edge. It may be the older meme, but for now it still has more bite.

You've likely come across the term "token" in your crypto ventures, or heard Bitcoin and Ethereum described as a token, but what does this all mean? In this article, we're breaking down what a token is, and how to distinguish a coin from a token and how it can be used as a tool to store value.
Token Definition
A token, in the cryptocurrency sense of the world, represents a particular asset or utility. It's worth noting in this item that tokens and cryptocurrencies are terms often used interchangeably however they technically differ. Tokens typically fall into one of the following three categories:
Payment tokens
These tokens allow users to purchase goods and services outside of the blockchain, offering an alternative currency.
Security tokens
Similar to initial public offerings (IPOs) on the stock market, security tokens offer users an ownership stake or entitle the holder to dividends in a blockchain project.
Utility tokens
Utility tokens offer users access to a service within a particular ecosystem, similar to loyalty points on a Starbucks card. These points hold value within their own ecosystem but cannot be used outside of that.
Coins vs Tokens
Getting more technical, when exploring coins vs tokens, tokens are categorised as crypto assets that have been built on top of another blockchain while coins are built on their own blockchain.
Ether, for example, is the native token to the Ethereum blockchain, however, the platform allows developers to create a range of token standards on top of it. Based on this information, all ERC-20 tokens are therefore categorised as tokens as opposed to coins.
USD Coin (USDC) and Tether (USDT) are therefore tokens as they are built on top of the Ethereum blockchain. While each network is operated by its own leadership, both use Ethereum's blockchain to facilitate all transactions.
How Are Tokens Traded?
Much like coins, tokens can be bought, sold and traded on exchanges, or sent directly from one wallet to another. This is facilitated by blockchain technology, in the same way that coins are transferred from one location to another. Unlike coins, which are all fungible in nature, tokens can sometimes be non-fungible, meaning that they are not identical in value and function.
Tokens are sent using the wallet address of a recipient's blockchain-compatible wallet. The address is often represented by a barcode in the form of a QR code, or through a lengthy alphanumeric code. All transactions take place from the wallet holding the tokens and are sent directly to the wallet of the recipient without the need for a centralized authority like a bank. Tokens can typically be bought on exchanges, often with Visa or Mastercard, or exchanged between users.
How is an NFT Different from Cryptocurrency?
Non-fungible tokens (NFTs) are all different from each other as they each represent a real-world object, whether a digital piece of artwork or a bottle of fine wine. Bitcoin can be traded for anything around the world, whereas NFTs are unique in nature and while they hold value they cannot be used interchangeably.
What Are NFTs Used For?
NFTs are used to represent a particular asset, whether it be physical or digital. When minted, these tokens will permanently represent that asset and cannot be changed. For example, one NFT could represent an apartment in London while another could represent a song by Kings of Leon. The possibilities are endless, and the marketplaces are huge.
Users can easily trade NFTs on marketplaces (through a website or mobile app) such as OpenSea or Rarible. Once you own an NFT you are credited with the ownership rights of the asset the NFT represents. Due to the nature of blockchain technology, this is permanently displayed on the network's public ledger for anyone to review. This process ensures that the ownership of an NFT cannot the changed and the information is available for anyone to credit.
Note that several blockchain networks currently support the minting of NFTs, and the holder will need a wallet specific to that blockchain in order to hold the NFT.
Are Tokens Regulated?
When it comes to regulation, countries around the world are currently drawing up legal frameworks to better implement cryptocurrencies into our current financial system. This includes the likes of tokens.
Once cryptocurrencies are regulated by government authorities, they could provide the world with unrealized use cases like being used to manage a prescription at a pharmacy or clinical services or to provide feedback to IT support. While there are plenty of tokens available on the market today, it's likely that this is only the tip of the iceberg in terms of their potential to improve issues faced around the world.

As you navigate the waters of the cryptocurrency market you're likely to come across a term called "coin burning". In this article, we're exploring the process used to manage the token supply of projects, a means for companies to manually alter the supply (and thereby demand) of a token's circulating supply. While not adopted by every project, coin burning has proven over the years to be successful in increasing the price of a digital currency.
What Is A Coin Burn
Diving right in, a coin burn is the process of removing a certain number of tokens from circulation by sending them to an invalid address, a "black hole" of sorts. This process is written into the project's code and implemented at various increments as outlined in the whitepaper. While Bitcoin doesn't make use of coin burning, many projects on the Ethereum network, particularly ERC-20 tokens, have been known to implement it.
Through the use of a smart contract, also known as a burn function, the network would remove a specified number of tokens from circulation, decreasing the total supply and thereby (hopefully) increasing the demand. Coin burns have been known to lead to an increase in price, as the supply-demand ratio is altered.
An Example Of Coin Burning
A top 10 cryptocurrency project underwent a coin burn last year that is believed to be the biggest layer 1 token burn to date. 88.7 million LUNA, the native coin to the Terra project, were burned in November 2021 following a vote by the community. This was effectively worth $4.5 billion at the time. A few days following the coin burn the LUNA token hit a new record high.
The burn aimed to remove value from Terra’s community pool, but in reality, it simply moved the value from the pool to the individual holders of the cryptocurrency.
Bitcoin Cash and Stellar are two other high profile cryptocurrencies that have made use of the coin burning initiative. Shiba Inu is another cryptocurrency to have undergone a coin burn, although this wasn't the initial intention of the project. The project's developers gifted half of the SHIB supply to Ethereum creator Vitalik Buterin, who went on to donate 10% and burn the remaining 90%.
How Does Coin Burning Work?
Should a project wish to implement a coin burn they will need to create a smart contract. Smart contracts are digital agreements that execute when certain criteria have been met. Say a project wants to implement a coin burn every 200,000 blocks, they will create the burn function to include this instruction.
When this milestone is achieved, the coins will automatically move from the designated wallet to a wallet address that does not have a private key. Without a private key, these coins can never be recovered. The coins will then be sent from the one wallet address to the other and effectively be removed from circulation. The transaction (burn) will be added to the network's blockchain records and be available to view through the blockchain explorer.
The Downside To Coin Burning
Before you invest in a project that undergoes coin burning it is important to note that coin burning does not guarantee an increase in the coin's price. The increase in price will depend on the network, the market climate and the current sentiment. During the Shiba Inu coin burn, while the price rose considerably, it soon returned to a more stable and substantially lower level.
Coin burning can also be used by ill acting developers to deceive the community. Say a project has a total supply of 100 million tokens and allocates 10 million to the platform's developers. They could then burn 40 million tokens, increasing their hold to 60% of the circulating supply on the network.
As with all transactions conducted on the blockchain, all payments are irreversible meaning that once you burn coins they can never be recovered.
What Is Proof Of Burn?
Not to be confused with coin burning, Proof of Burn (PoB) is a consensus mechanism similar to Proof of Work and Proof of Stake. The model utilizes an element of coin burning in its mining practice and is known to use considerably less energy than its PoW counterpart.
The process requires miners to burn tokens in order to participate in the mining process. The more coins burned the more blocks they can create, meaning the more rewards (in the form of transaction fees) they can earn. Miners are still required to use mining hardware. The benefit of this is to provide a less energy-intensive blockchain network that can run optimally through a network of decentralized mining participants.

ICO is an abbreviation for Initial Coin Offering, a term coined supposedly in 2013 yet only gained popularity in 2017. ICOs were created as a method of raising funds for cryptocurrency projects in a crowdfunding manner. When people partake in an ICO, through funding it, they receive "shares" of that project in the form of cryptocurrency tokens.
This method is set up to help new projects find funding to build their project, platforms, or products. It's very similar to investing in a start-up in the hopes of a project becoming bigger and better through your investment contribution.
Mastercoin was the first ICO recorded back in 2013, raising a grand total of 5,120 BTC. Shortly after, Ethereum followed, and in 2014 raised roughly $18 million to build their project. There is clearly a great deal of success to be seen through ICOs, so let's see what all the fuss is about.
ICO vs IPO vs IEO
Let's look at IPOs, or initial public offerings, to learn more about where ICOs originated.
Similar to ICOs, IPOs were created as a way of gaining capital to better the businesses' infrastructures. While they are similar to a crowdfunding aspect,the primary distinction is in how investors are rewarded. IPOs will offer their investors shares, while ICOs offer digital currencies that can be used within their ecosystems or can be sold when the price increases.
Now that we understand how ICOs and IPOs work, let's discuss the differences when it comes to IEOs, or Initial Exchange Offerings. Again, this is another method used to raise funds for upcoming projects, but there are some key aspects that make IEOs different to IPOs and ICOs. While IEOs are also a crowdfunding method in the cryptocurrency industry, they use an exchange. Anyone can generally buy tokens from an ICO page, whereas IEOs use exchanges as the distribution mechanism.
In order to take part in an IEO, you must be a registered user of the exchange that the project is utilizing. While IEOs may be more transparent, they do push us towards a more centralized approach. There are also IDOs, Initial Dex Offering, Dex standing for decentralized exchange (increasing the data privacy aspect), but that's a topic for another day.
How they work
So now we know what ICOs are and how they differ from their counterparts, but now let's delve deeper into how ICOs actually work. As stated, ICOs are a way for cryptocurrency projects to raise money. When a project decides to launch an ICO it will generally underline the sale dates, the participation rules, and the buying process.
Usually, investors will need to choose currencies they are happy to accept in exchange for their tokens, such as Mastercoin accepting Bitcoin. There are some ICOs who will also accept fiat currencies as payment.
The projects' core purpose, its timeline, and how much money is needed to succeed should be released in their whitepaper. If the project does not raise enough money to meet the minimum funds needed, the money should be returned to those who contributed. This would classify the ICO as unsuccessful.
If the funding goal is met, the project will continue to pursue its original goals and contributors will be able to claim their tokens further along. Tokens will either be listed on notable exchanges later on or will be distributed using smart contract technology,This is something you should do more study on before contributing to an ICO.
Advantages and disadvantages
While ICOs have proven to be a massive benefit to project developers, there are some underlying issues and risks that may come into play. In order to give you the best chance of understanding ICOs we will need to cover all the pros and cons that come with ICOs. So let's see what you have to look out for:
Pros
High potential profits
Accessible to anyone (unlike IEOs)
Money returned if unsuccessful (smart contacts)
Transparency on fund usage (Blockchain)
High liquidity
Cons
No intrinsic value
No legal guarantees
Potential fraud
Frequently asked questions
Now that we have covered the basics, there are some additional questions the internet has and we thought we would take the time to answer them for you. These are the most frequently asked questions about ICOs, and while we have answered some here is a more TL;DR breakdown:
What does ICO mean?
ICO stands for Initial Coin Offering, a phrase coined by the cryptocurrency industry.
What is the purpose of an ICO?
ICO is a method used to raise funds for up and coming projects, think of it as an early investment phase.
How do I get an ICO?
That depends on the ICO you want to partake in, you will generally need to sign up to the ICO, deposit funds, and wait for the tokens to be distributed either through an exchange or smart contract. This differs depending on the projects' ICO parameters.
Is Bitcoin an ICO?
No, Bitcoin required no funding, tokens were mined and sold without the need for crowdfunding.
How many ICOs are there?
There is no definitive number out there but consensus shows that there have been roughly over 7,000 businesses that have attempted ICOs.
Are ICOs safe?
This is a tricky question and depends greatly on the individual project that is hosting an ICO, whether they are using smart contact technology, and how legitimate the team behind it is. ICOs can be safe, but they also carry risks, it is always best to do your own research before investing.
As there is no universal authority on ICOs there is certainly a lack of regulation in the space so be sure to do thorough research before parting ways with your money.
Closing Thoughts
That is all the essential information you need to grasp in order to better understand what an ICO is. From the textbook definition to its competitors, how it works, and everything in between. ICOs are popular for a reason, they offer a range of benefits to both projects and investors, but you should keep in mind that there is no benefit without risk.
While we can explain what an ICO is, we can not tell you whether to invest in an ICO. It's important to vet the project for yourself and see if it aligns with your interests, and more importantly if it has all the key components for a legitimate project and token.
While the world is increasingly accepting of ICOs from both businesses and retail investors standpoints, there are several alternatives available. We briefly discussed IEOs and IDOs, but more crowdfunding methods have flourished from the origins of ICOs, so be sure to explore those out too. At the end of the day, we hope we helped you better understand what an ICO is.

When learning about paper wallets it's likely that you came across this option nestled safely in the “cold wallet” section in the different types of cryptocurrency wallets. While the popularity of paper wallets has somewhat declined, there are still a strong number of crypto enthusiasts that still appreciate the completely offline storage option. Let's explore what is a paper wallet and whether it's suited to your crypto needs.
What is a paper wallet?
For those needing a recap, a paper wallet is a piece of paper that holds both one’s public and private keys in both alphanumeric form and QR codes. Known as a non-custodial cold storage wallet, paper wallets allow the holders to manage their own private keys and remain entirely offline. A private key is a unique code that grants a user ownership of their wallet and digital funds, akin to a pin code for a bank account.
Creating paper wallets is incredibly simple, and can be completed in a matter of seconds. As a paper wallet "functions" offline, this makes them free from hackers, unlike a software wallet which is operated online. However, the paper wallet still carries its own set of risks in that the piece of paper cannot get damaged or lost. Many Bitcoin paper wallets have been lost due to the paper fading or the information becoming illegible.
The objective of keeping a paper wallet is to keep the private key safe whether its for a Bitcoin paper wallet or one designed to hold any other cryptocurrency. Each crypto wallet will be designed to store one specific cryptocurrency.
The term Bitcoin wallet is a generic term for any type of crypto wallet, whether a paper wallet, a software wallet or any type of online wallet or hot wallet. The only distinguishing factor is that the digital wallet only holds Bitcoin.
Precautions for using paper wallets
While storing the paper wallet securely in a safe location makes the top of the list here, other precautions to take are listed below:
Quality printer
Always use a good quality printer. Ensure that your paper wallet is printed with a high-quality inkjet printed to ensure that the characters on the paper don’t fade or bleed over time. Should this happen you could lose access to your funds.
Don’t share private keys
Never share your private keys with anyone. Paper wallets are designed to show the public key QR code on one side and the private key on the other. When sharing your public key with someone be sure not to accidentally share the private key as then they could gain access to your funds.
Be sure to set up a change address
If you don't set up a change address before sending funds from a paper wallet, the leftover funds will go to waste. A change address is a separate wallet address that picks up the change from a transaction.
If you have, for example, 100 BTC in your Bitcoin paper wallet and only spend 0.50 BTC, the remaining 99.5 BTC will either be sent to the change address or lost from your own paper wallet entirely.
Paper wallets are not designed to be used for sending funds, but instead for receiving and storing funds for the long term. Hot wallets (as opposed to paper wallets) are better suited to users looking to frequently send and receive funds. There are plenty of crypto wallets on the market, ensure that you find the most convenient one for you.
Alternatively, funds can be stored in a yield-generating account where your funds can earn interest. Tap offers a wallet of this nature conveniently located on the app, which allows users to hold several crypto and fiat currencies and earn rewards based on each currency. The longer the funds remain there, the higher the yield.
While paper wallets remain offline, there are still risks associated with them. Be sure to adhere to the above precautions in order to keep your funds safe.
Are paper wallets still relevant?
In the early days of crypto trading, paper wallets were strongly advised due to the offline safety of storing private keys. They began to be popular around the end of 2010 but unfortunately have been on a decline in more recent years as innovation in the industry has picked up momentum. A paper wallet is resistant to online attacks as long as it's made correctly; you can't hack a piece of paper.
In the past, people could create and print paper wallets for their crypto right from their exchange accounts. But now experts believe that hardware wallets are a more secure option, so most major exchanges don't offer this service anymore.
While some die-hard crypto traders still believe in the solid security of paper wallets, there are plenty of more innovative options available on the market today.


.webp)


.webp)